Altar is the first of the four Babel stages.
Description[]
The first stage of Babel is the Altar! These stairs draw in the mysteries of the universe, and are the first step on the path to the final area.
These random walls make things all the harder. Go forth, and use your expertise and intuition to forge a path.
Overall Layout[]
Single[]
In Single mode, Altar generally consists of ~150 steps, divided into 10 levels of ~15 steps each. Each level has a predefined set of possible wall patterns that are randomly selected. The game will not select the same wall twice in a row.
The 10 levels can be categorized into several distinct phases based on the general wall heights and widths.
Altar is generally a wide stage, being 7 or more blocks wide for the first two thirds and never dropping below 5 walls wide. Dark and Cracked blocks are common especially in the later stages of the level.
Despite being the first stage, Altar can be quite frustrating due to the large size of the walls and the ability to miss things but not lock yourself out immediately, leading to a slow death further down the line. Some people have reported Menhir to be less frustrating as a starting point due to its smaller size and much more obvious solutions to each wall, which teaches some basic key techniques by repetition.
Levels 3 and 7 are the trickiest and studying the wall chart and knowing what to expect can be a great help.
Phase 1[]
Phase 1 consists of roughly the first 45 steps and corresponds to Levels 1-3. Walls are generally 8 blocks wide and 2-3 blocks high.
The walls start pretty basic, and start increasing in the number of holes and special blocks in them as the phase goes on. Cracked blocks start appearing early on, and Dark blocks follow suit.
Some walls have a tendency to have a few extra solitary blocks on the top row (e.g. the right side of Level 1, pattern 1 in the Altar Wall Chart), which can easily screw up the subsequent wall(s) because of the Edge mechanic which breaks up the wall into two different heights. This can sometimes, though not often, make Phase 1 one of the trickier phases. Of special note is the annoying tiny wall on Levels 2 and 3 (pattern 9 in both levels in the wall chart)
A good tactic in this phase, is to look for the bigger 'landing' (the top surface of a wall) at least 3 blocks wide and work up to there. Eventually due to the edge mechanic, several walls down the line the landing will be one solid surface again.
Phase 2[]
Phase 2 corresponds to Level 4, and consists of steps 45-60. It's basically a 'checkpoint' phase, with solid layers of 7-wide walls with alternating columns of cracked blocks. This phase functions to get rid of the remaining randomness caused by the uneven landings in phase 1 and is a freebie ~15 steps high.
The first wall on this phase can be either 2 or 3 blocks high. This starting 3 block wall should not be a problem to overcome regardless how awry the end of Phase 1 was - as long as the final landing of Phase 1 is 2 blocks wide the 2x3 technique can be used to traverse up, and then the series of solid 2-high walls allow a stable landing to be rebuilt.
Phase 3[]
Phase 3 corresponds to Levels 5 and 6, from roughly steps 60-90.
With the randomness prior cleaned up and starting with a flat landing, Phase 3 begins with a series of walls generally 7-wide and 3-4 high. In many ways this is actually the easiest phase by abusing the 2x3 technique. (See: Babel Tips)
One tricky pattern is the first pattern of Level 6 on the wall chart. Due to its alternating gaps and Cracked Blocks at the sides, along with the gap preventing a spider across, it's extra-hard to create a stable landing to build a solution from. The solution up this wall needs to take this into account and allow for additional traversal options while building a stable landing.
Phase 4[]
Phase 4 corresponds to Levels 7-9, roughly steps 90-135
The walls in this phase narrow down to 5 blocks wide. It is beneficial to note that Level 7 (the start of this phase) is the hardest throughout Altar, due to the numerous single-step Cracked Blocks, and awkward landing shapes. Geronimo is a very useful technique here, and generally planning to have the penultimate row serve as landings rather than the top surface, by pushing the top blocks out of the way sideways.
For example, to deal with pattern 3 on Level 7 (arguably the worst wall in Altar), step on the cracked block at d3 by walking on it, push f4 to the right, then pull-out f4 from the next wall (if it's there). This creates a stable 2-block landing to build the next solution from, with an additional 2-block landing (c2+d2) as a buffer should additional work space be required.
In comparison to Level 7, Level 8 is a freebie with solid walls, and Level 9 is only somewhat tricky from the fact that a 5-high wall needs to be traversed from small landings. (No problem with Econ Inazuma and 2x3 though)
This can be a very frustrating phase, due to the fact that it is the hardest one, and that it takes quite a while to get to this phase to practice it in the first place. A viable alternative is to practice the starting section of Menhir to develop techniques to deal with tight spaces.
Conclusion[]
Phase 5 corresponds to Level 10.
At ~135 steps, Altar is basically over, as the only wall patterns present are wide, fully rectangular 3-storey walls with alternating columns of Cracked and White Blocks, followed by a similar 4-storey wall containing the goal.
Pair[]
In Pair mode, Altar consists of approximately 100-110 steps split into 10 Levels.
The first phase corresponds to Levels 1-4 which corresponds to the first 40 steps (Level 2 occurs around 10 steps, Level 3 occurs around 20 steps and Level 4 occurs around 30 steps). Just like its Single counterpart, Altar also starts with simple, wide walls (3-storey and as wide as eight blocks long) requiring a single pull to traverse usually requiring only a single pull/push for both players to proceed. The wall patterns will then progressively become more irregular while also featuring Cracked Blocks from Level 3.
The second phase corresponds to Level 5 begins when the player reaches around 40 steps. The patterns now simplify to a series of 2-storey fully rectangular walls of blocks with Cracked Blocks appearing in the top row. This phase is comparable to the Level 5 wall patterns in the Single counterpart of this stage, in that it serves as a "checkpoint" phase by spawning these simple wall patterns to eliminate any random wall configurations made by the player in the previous Levels.
The third phase corresponds to Level 6, Level 7 (Level 6 occurs around 50 steps, Level 7 occurs around 60 steps). The wall patterns are now four stories tall with only a few Heavy and Cracked Blocks. Some wall patterns now have their bottom-most row of blocks nearly empty but they should still form solid enough footing.
The fourth phase consisting of just Level 8 occurs at around 70 steps. The players simply have to scale up a series of 3-storey solid walls serving as another checkpoint section like Level 5.
The fifth phase consisting of just Level 9 occurs around 80 steps. The wall patterns here can be slightly tricky but it can be solved by simply using the Timber on a key supporting block to be able to comfortabley proceed to the next block.
The sixth phase consisting of just Level 10 occurs around 90 steps. The stage is finished with a series of fully soild rectangular walls of regular and Cracked Blocks with the final wall having a column of Immovable Blocks along the center and two Goal Blocks on the top-most row besides the column of Immovable Blocks.
The Trivia For Tonight.....[]
- The music is Hen-To-Hen. This song hasn't been released on any official Catherine soundtracks.
Gallery[]
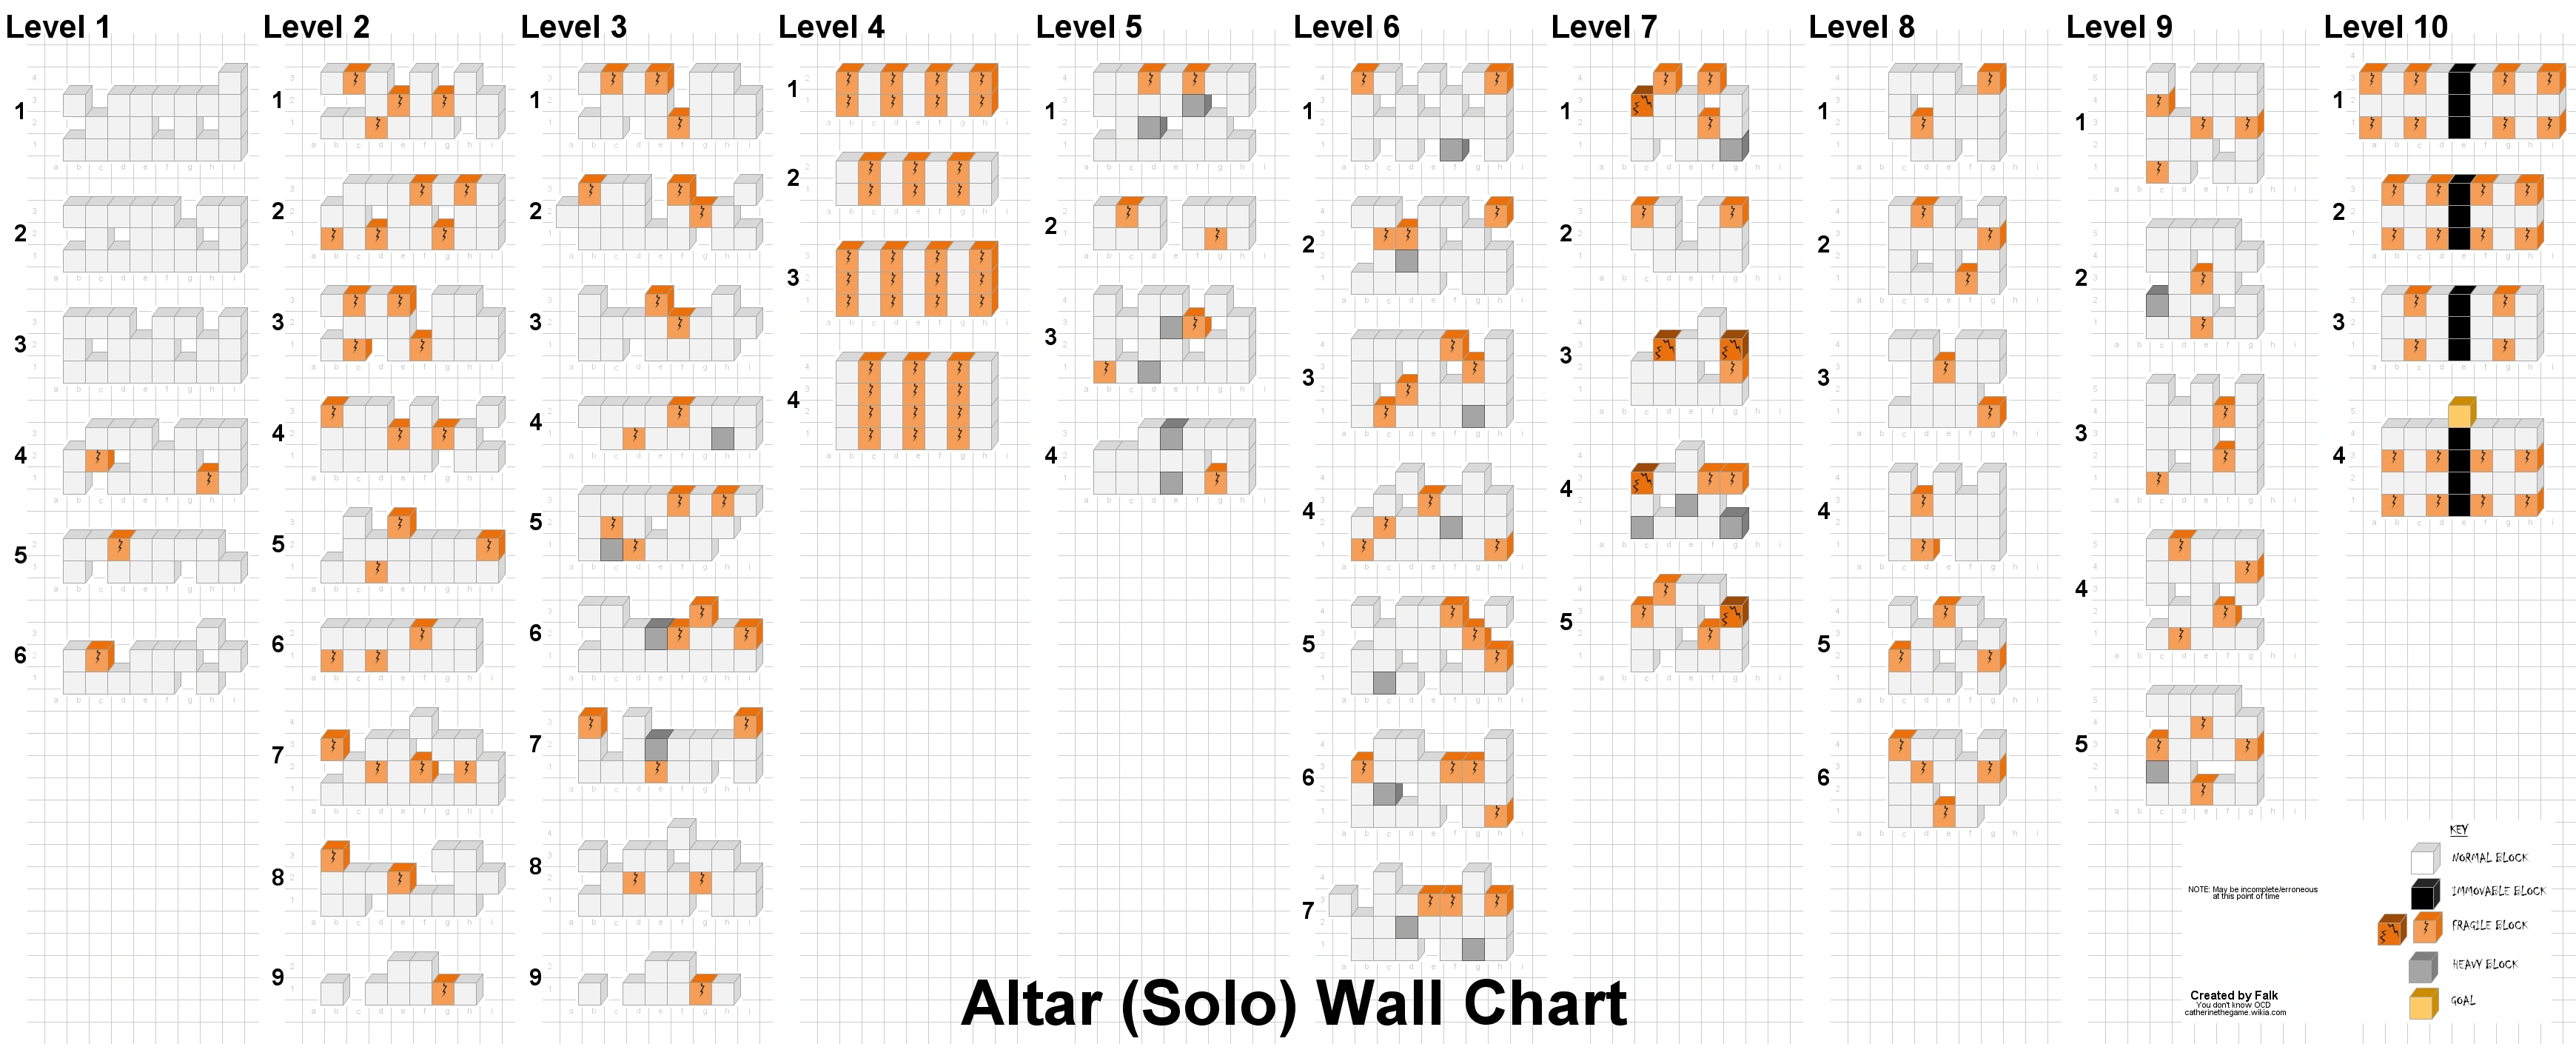
_Wall_Chart.png)
Videos[]


| Stages and bosses | |
|---|---|
| Underground Cemetery: Prison of Despair: |
1-1 2-1 · 2-2 · 2-3 (Fist of Grudge) |